
29.11.2023
Summary
This document describes how to observe with PEPSI at Vatican Advanced Technology Telescope (VATT).
Observations are performed with following steps:
I Accessing PEPSI GUI
II Connecting with VATT
III Selecting and sending targets to VATT
IV Guiding
V Observing
The document also describes following items:
VI Viewing obtained spectra
VII Estimating S/N
VIII Calibration frames
IX Telemetry
X Troubleshooting
I Accessing PEPSI GUI
There are 3 options for from where the observations can be done. NOTE that for Options 2 and 3 you must request VPN access to LBTO beforehand – at least 10 days before the run. Write to ScienceOps@lbto.org to get it!
- Option 1: use the PEPSI 4K monitor in the LBT control room
- Option 2: connect to it from VATT
- using ‘vattarchive’ server
- login as ‘vattobserver’, passwd is at control room
- type in terminal vncviewer -via USERNAME@ssh.lbto.org alpha.pepsi.lbto.org:1
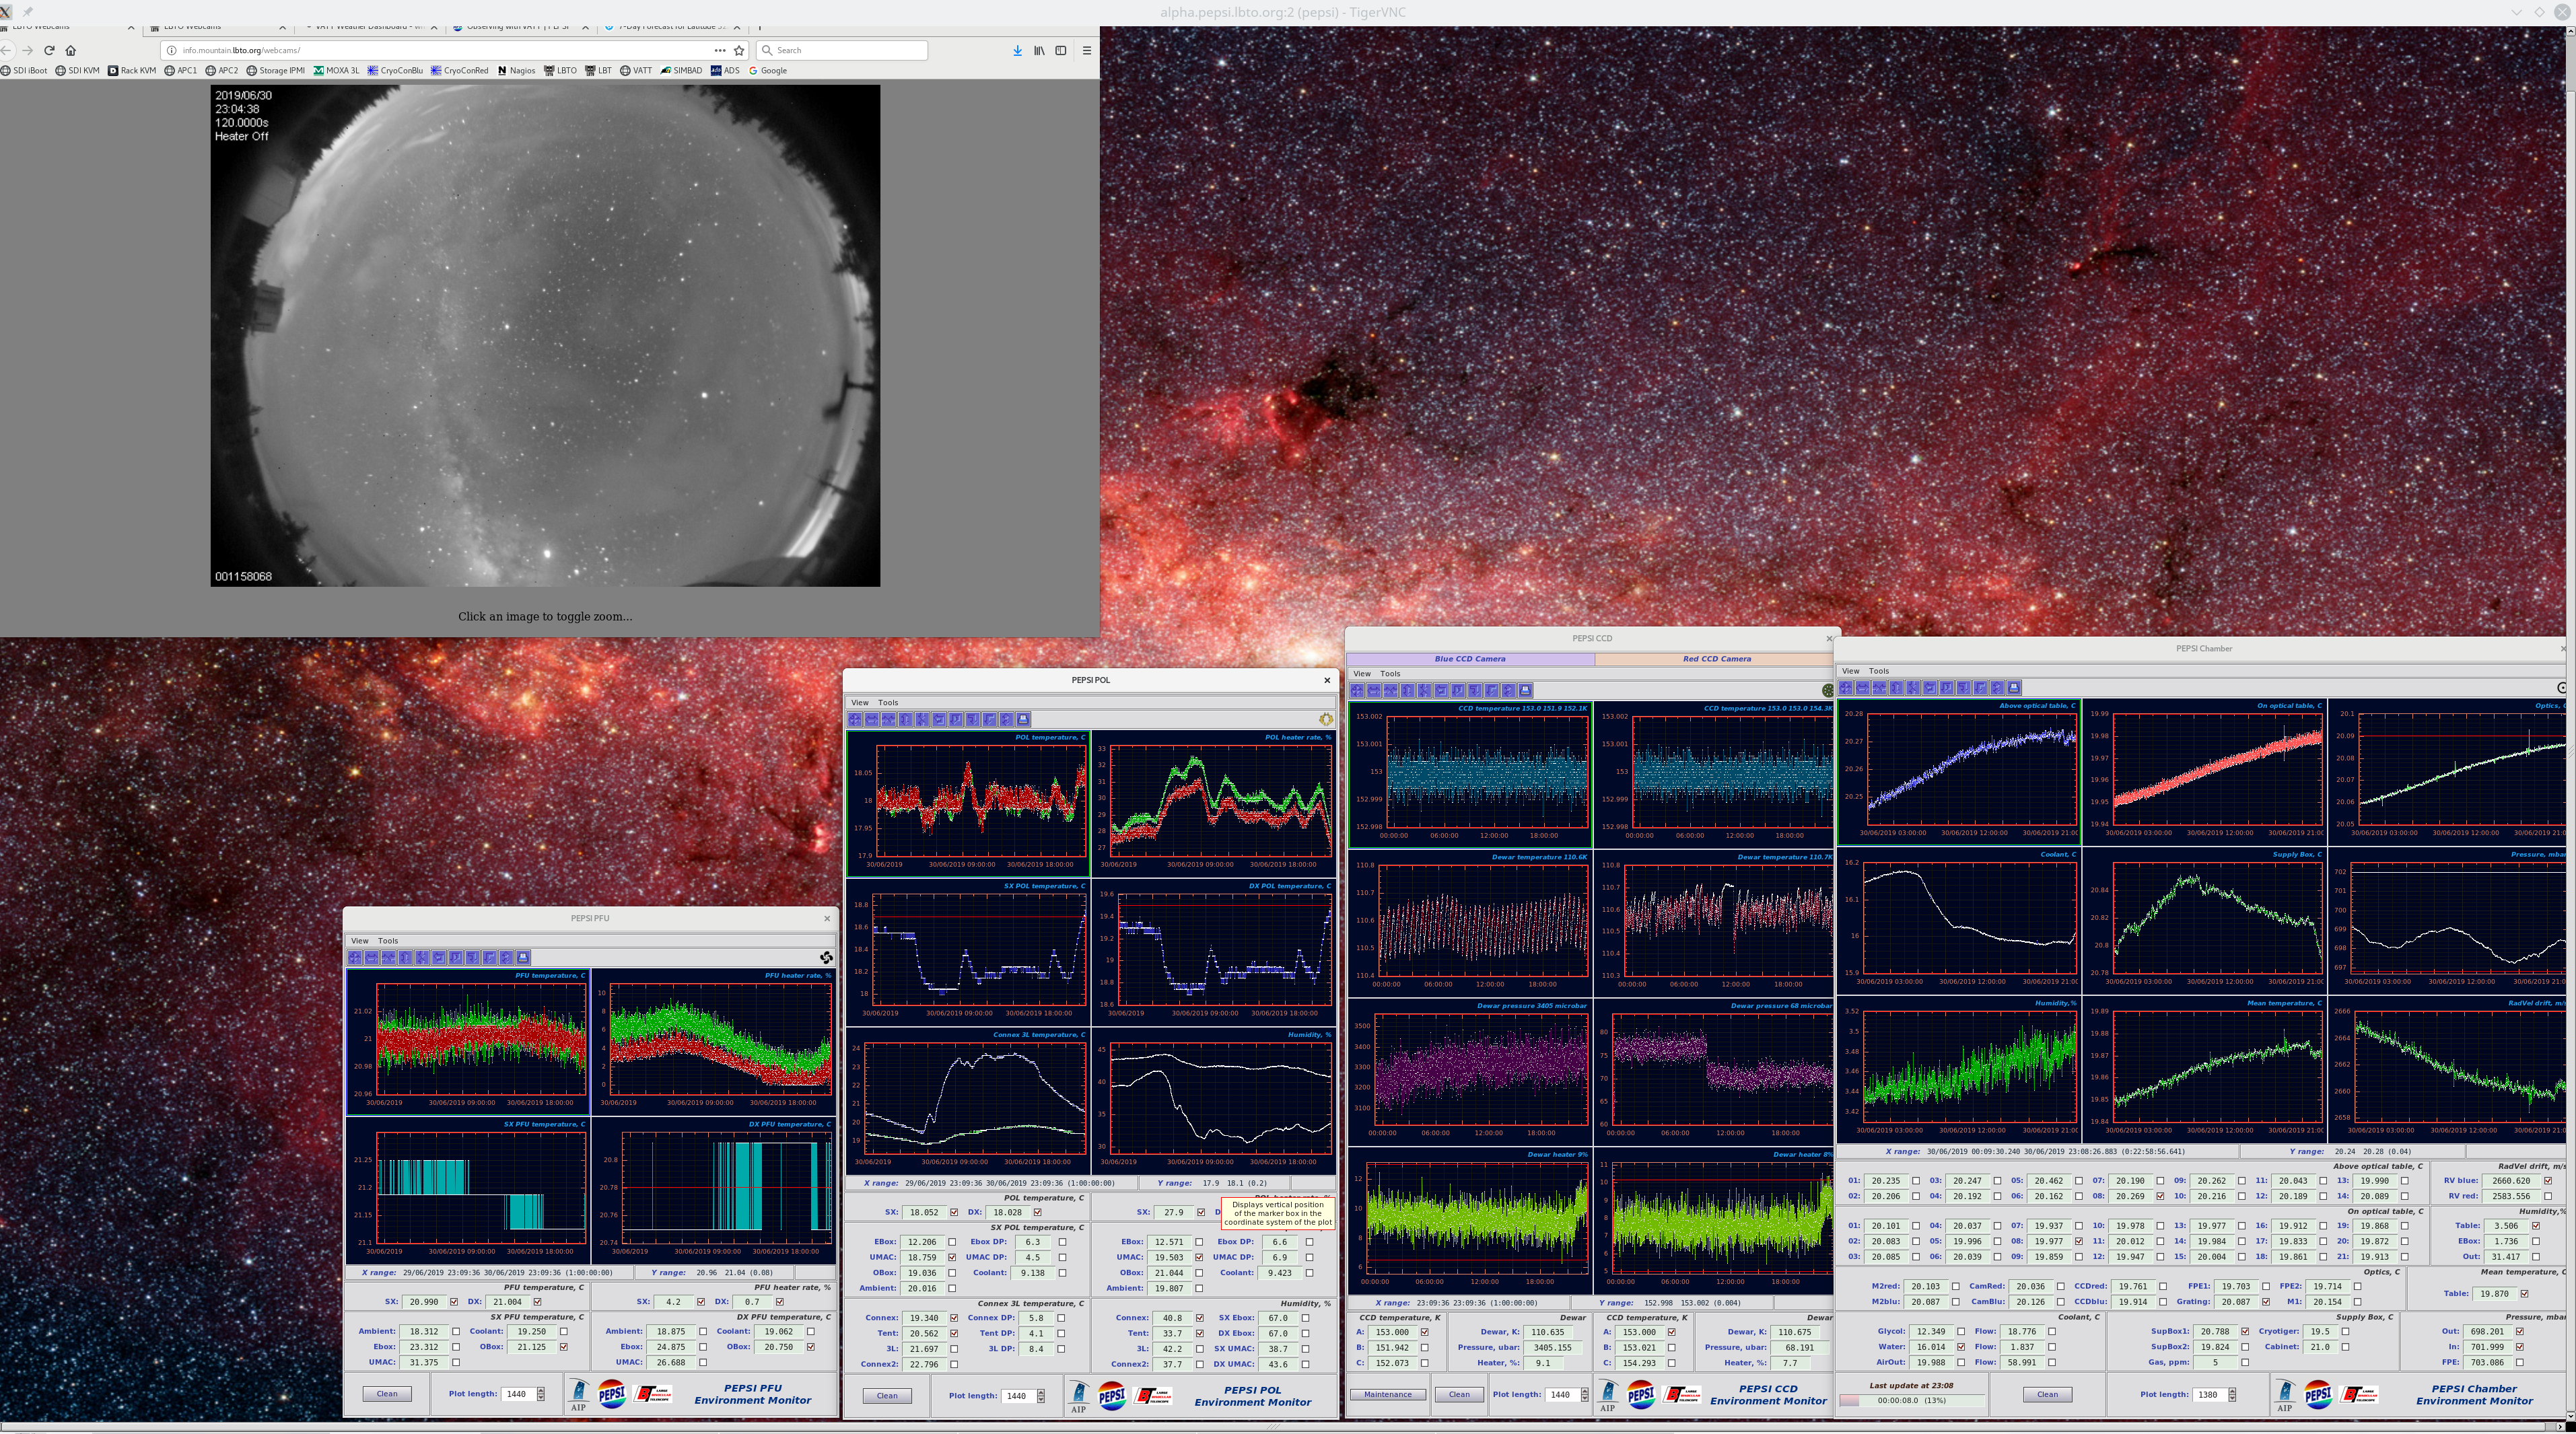
- environment (telemetry) status can be seen at :2
- account passwd has been given to you by LBTO
- Option 3: observe remotely
-
- first make a VPN connection to vpn.lbto.org (using Cisco AnyConnect)
- then either open a VNC program and take connection to server alpha.pepsi.lbto.org:1 (or :2) or type in terminal vncviewer alpha.pepsi.lbto.org:1
- in the end, close the VNC connection, exit viewer and disconnect VPN

The PEPSI user interface program should be kept running all the time.
- If it is not running, click Activities in the left upper corner. You should get a menu having PEPSI logo. Click on that logo to open the program.
- Or use a terminal to open it (if not, open a new terminal):

- on pepsi@alpha type ‘pepsi’

II Connecting with VATT
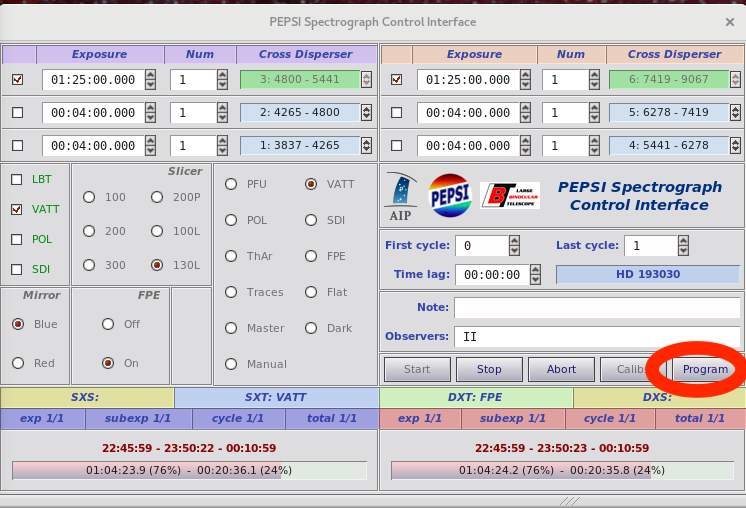
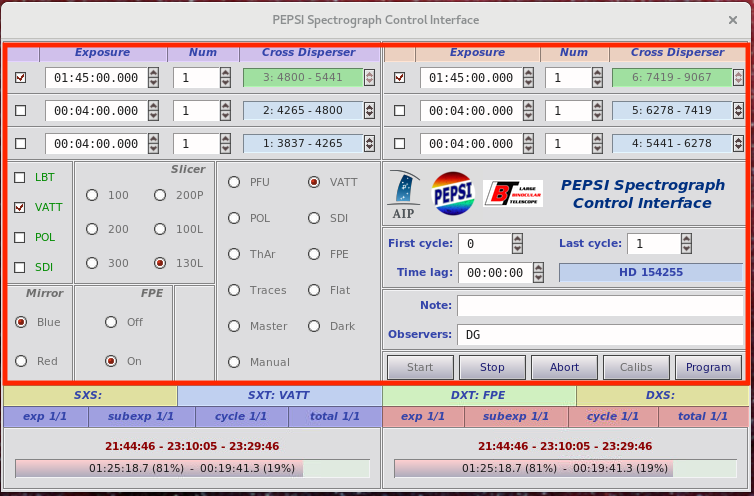
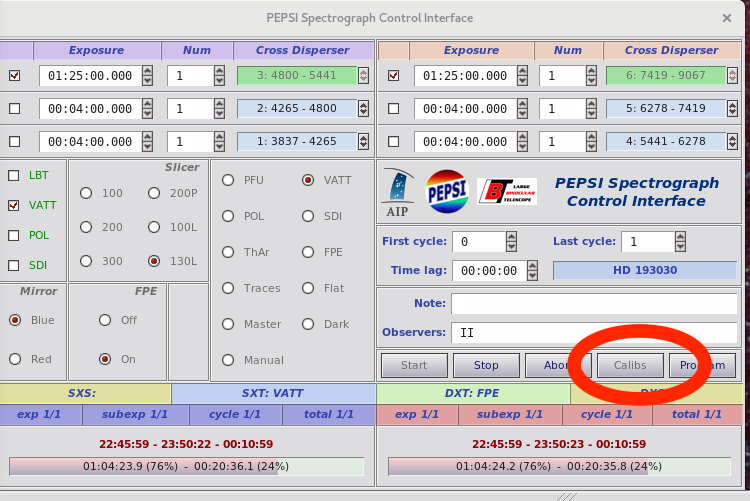
- Now you should have ‘PEPSI Spectrograph Control Interface’ open:
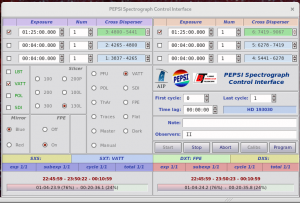
- There make sure that both ‘VATT’ options are checked
- ‘VATT Telescope Control Interface’ and ‘VATT Guiding Camera’ windows should appear:


III Selecting and sending targets to VATT
- Click ‘Program’ button on ‘PEPSI Spectrograph Control Interface’:
- When you
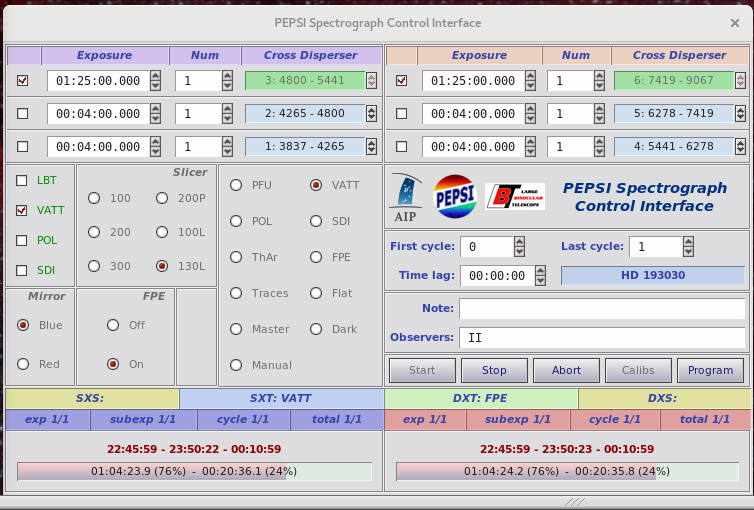
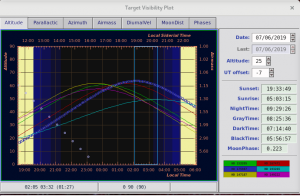
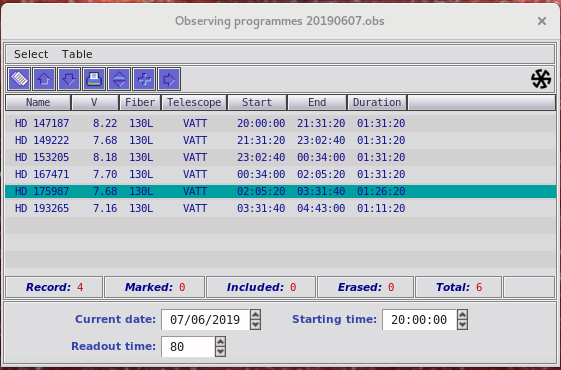
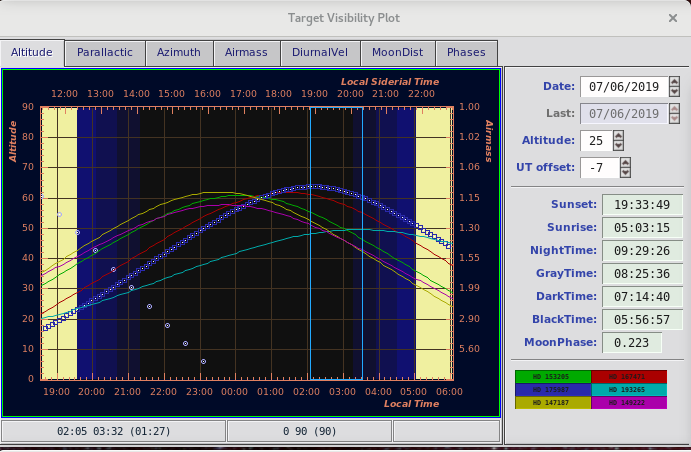
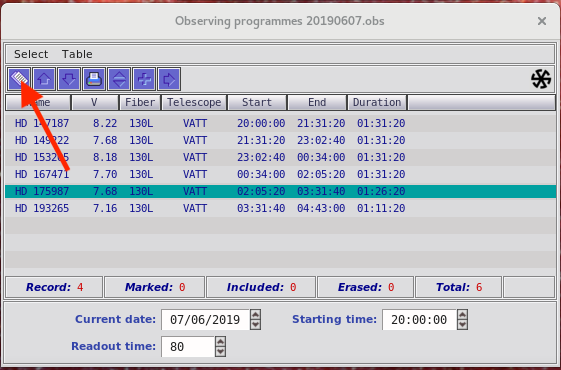
- already have an observing program, a ‘Observing Programmes‘ window and a ‘Target Visibility Plot‘ window opens. If not, go to ‘Table‘ menu, choose ‘Open or Close Table‘ and select the correct one.
- If GUI had to be restarted, check that the correct program is open (YYYYMMDD.obs)!
- select the target (highlighted with teal colour) you want to observe and send it to VATT. This does not yet move the telescope!

- Note that target can be sent already during CCD readout!
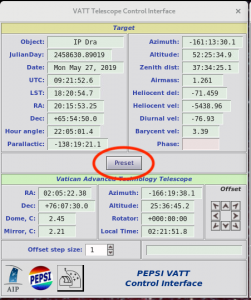
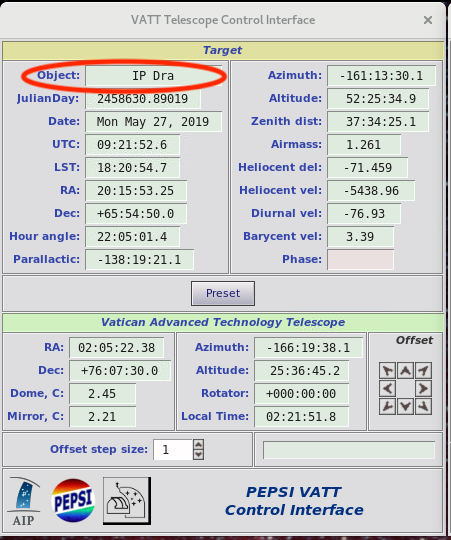
- check that ‘PEPSI VATT Control Interface’ has the same target as you chose, or resend:
- check that ‘PEPSI Spectrograph Control Interface’ changed (target name, selected cross-dispersers, exposure time, etc.) according to selected target:

- Note that the changes happen only after CCD readout has finished.
- if you need to change pre-defined exposure times, click ‘Edit fields’:
- a new window pops up and you can make the changes:
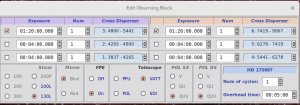
- Note that values in ‘PEPSI Spectrograph Control Interface’ do not change unless you send the target information again (see A.)
- select the target (highlighted with teal colour) you want to observe and send it to VATT. This does not yet move the telescope!
- don’t have any targets or you want to change targets
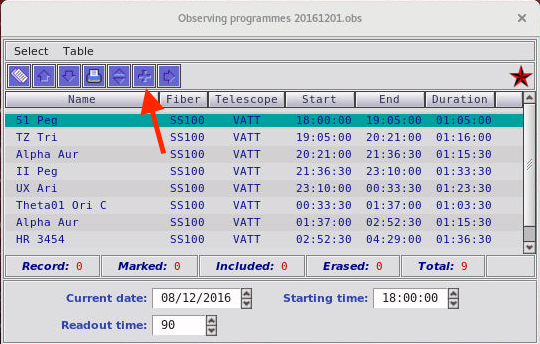
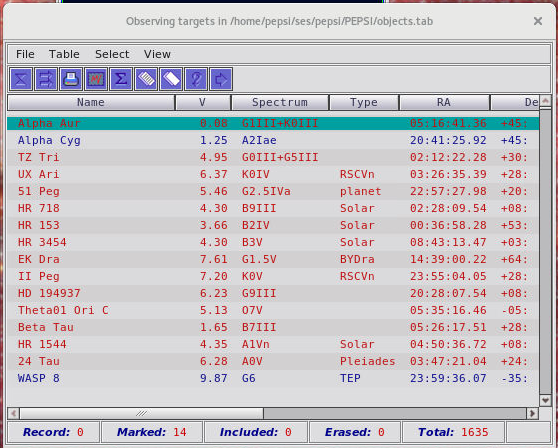
- click ‘add another object’ in ‘Observing programmes’ window:
- a new window having targets pops up:
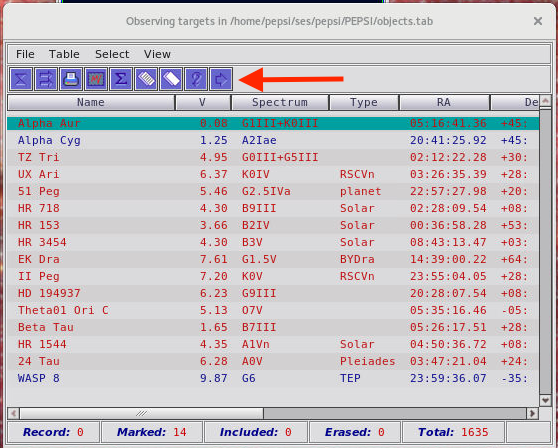
- choose the target and send it to the observing program:
- Additional things to take into account when making observing programmes:
- The entire spectral range is from 383 to 912 nm but it can not be covered by a single exposure
- PEPSI has two arms, blue and red that cover specral ranges 383-544 nm and 544-912 nm, respectively
- Each arm has three cross-dispersers:
- CD1 383-426 nm in blue arm
- CD2 426-480 nm in blue arm
- CD3 480-544 nm in blue arm
- CD4 544-627 nm in red arm
- CD5 627-741 nm in red arm
- CD6 741-912 nm in red arm
- Simultaneously, one can observe one wavelength region in blue and one in red, however, CDs 3 and 4 can not be used at the same time
- Exposure time depends on the used cross-disperser
- One can have different exposure times for cross-dispersers in blue and in red arm
- continue as in III-2-a.
- click ‘add another object’ in ‘Observing programmes’ window:
- already have an observing program, a ‘Observing Programmes‘ window and a ‘Target Visibility Plot‘ window opens. If not, go to ‘Table‘ menu, choose ‘Open or Close Table‘ and select the correct one.
- after the telescope operator gives the permission, click ‘PRESET‘:
- ‘PRESET‘ to next target can be done already during CCD readout.


IV Guiding
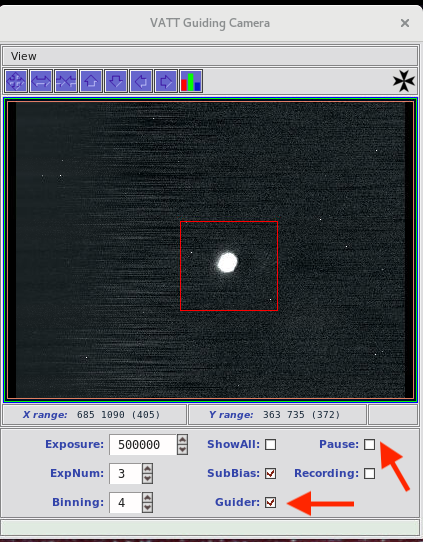
- Click ‘Guider’ to open guiding window to keep the target on the pinhole, check that ‘Pause’ is unchecked:
- When the telescope adapter has been connected, you should check the hot spot coordinates (direct reflected image position). If you see the image of the star on the pinhole (doughnut) spilling over asymmetrically, correct hot spot coordinates. As reference, summer 2019 values were x=880 and y=566.
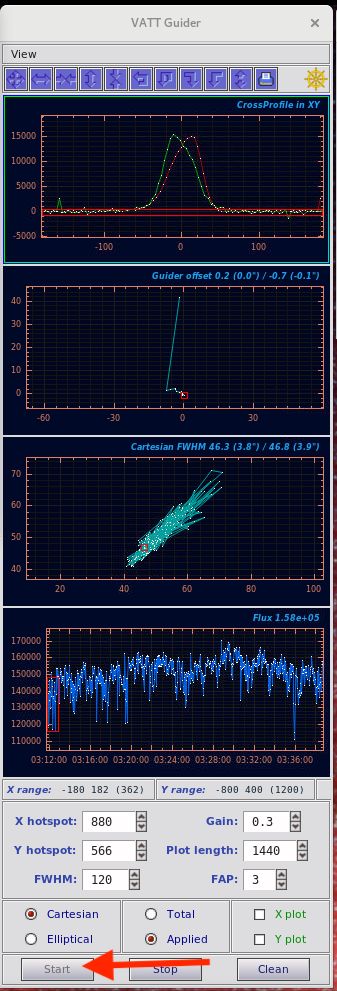
- When you are happy with the plots in ‘VATT Guider‘ window, start guiding by ‘Start’:

- The upper most plot shows the cross profiles of the target in both X and Y direction and they should overlap and converge to zero. The second plot from top shows the guider offset and third FWHM of the star. The bottom plot shows how much flux the guiding camera gets. This gives a good indication of passing clouds.
V Observing
Start observations by clicking ‘Start’ in ‘PEPSI Spectrograph Control Interface’:

VI Viewing obtained spectra
It is good to take a look at the spectra in order to see if you should change exposure times etc.
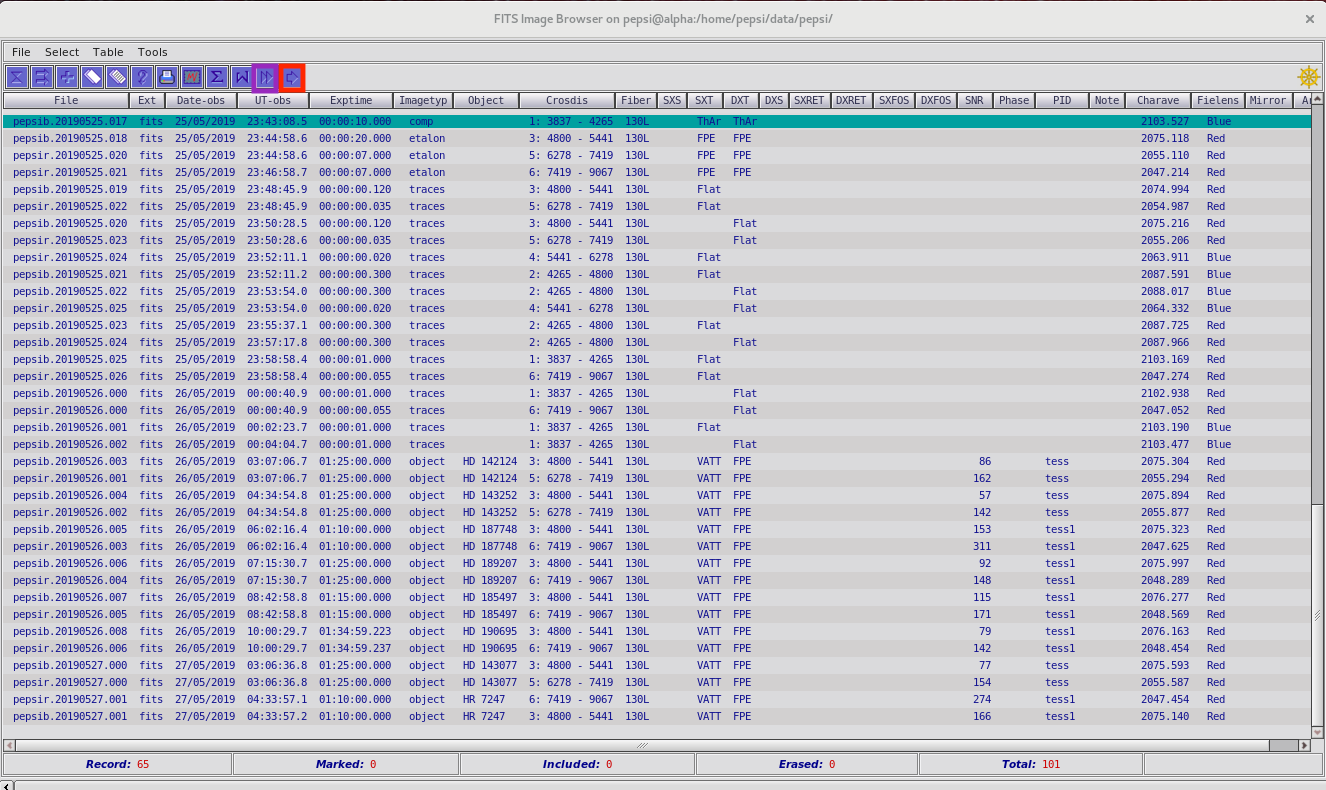
- Select the spectrum (highlighted with teal colour) you want to look at from ‘FITS Image Browser‘ with Enter or click the arrow icon to send it to ‘Spectrum viewer‘. One can also look at multiple spectra by selecting them and clicking double arrow icon.
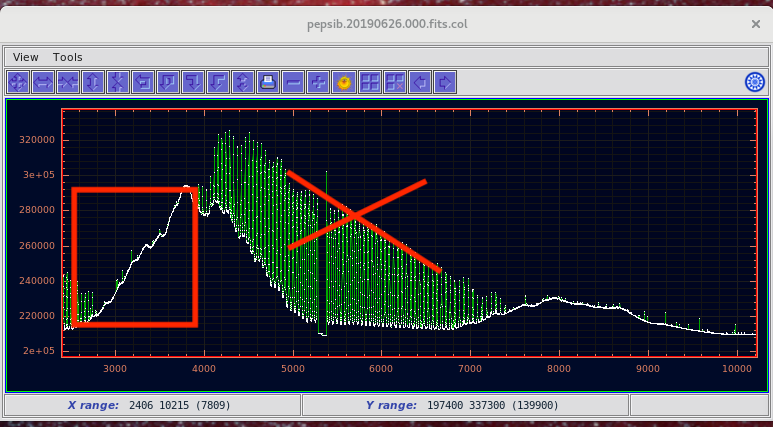
- The active window in ‘Spectrum viewer‘ has a cyan frame. Select the area you want to look at closer by drawing a red box with, for example, a mouse:
- To see a summed spectrum of the selected area
- Press ‘Enter‘, or
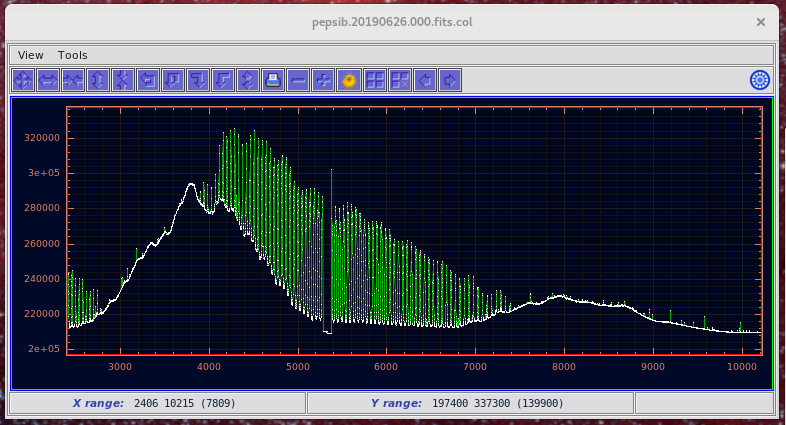
- Click the normal ‘Sigma‘ icon (one dimensional cross-cut in horizontal direction) on top of the viewer (the other sigma makes it in vertical direction)
- Now you have a spectrum plot where you can see the ADUs:


VII Estimating S/N
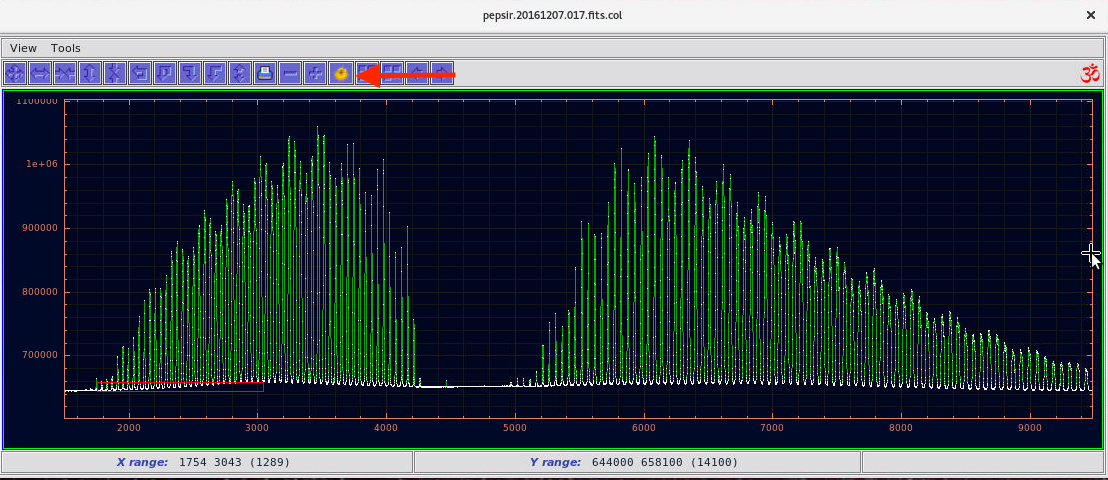
- Select an area with mouse from highest continuum values to lowest (don’t be distracted by high fabry-perot peaks):
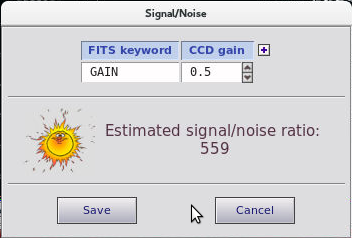
- Click ‘Sun‘ icon on top of the spectrum viewer:
- You get a pop-up window there the S/N estimate is given, save that information into fits list by clicking ‘Save‘:
VIII Calibration frames
After the observing night is over, it is time to take the calibration
frames. Check that you have stopped guiding and guider camera is on pause.
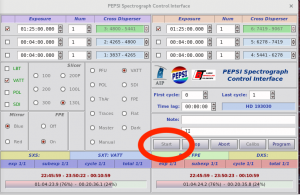
In the ‘PEPSI Spectrograph Control Interface’ window:
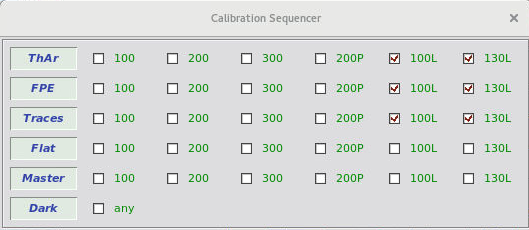
- Click ‘Calibs‘ button to get a pop-up window:
- Check that for wanted fiber(s) ThAr, FPE, and Traces are chosen (summer 2019 130L is used):
- Click ‘START‘ button on Control Interface window:
- Note that calibration settings (exposure times, etc.) get visible in the control interface after pressing ‘Start’.
- When calibration frames are ready, click ‘Calibs‘ again to close the calibration sequencer window and to be able to do anything else.
IX Telemetry
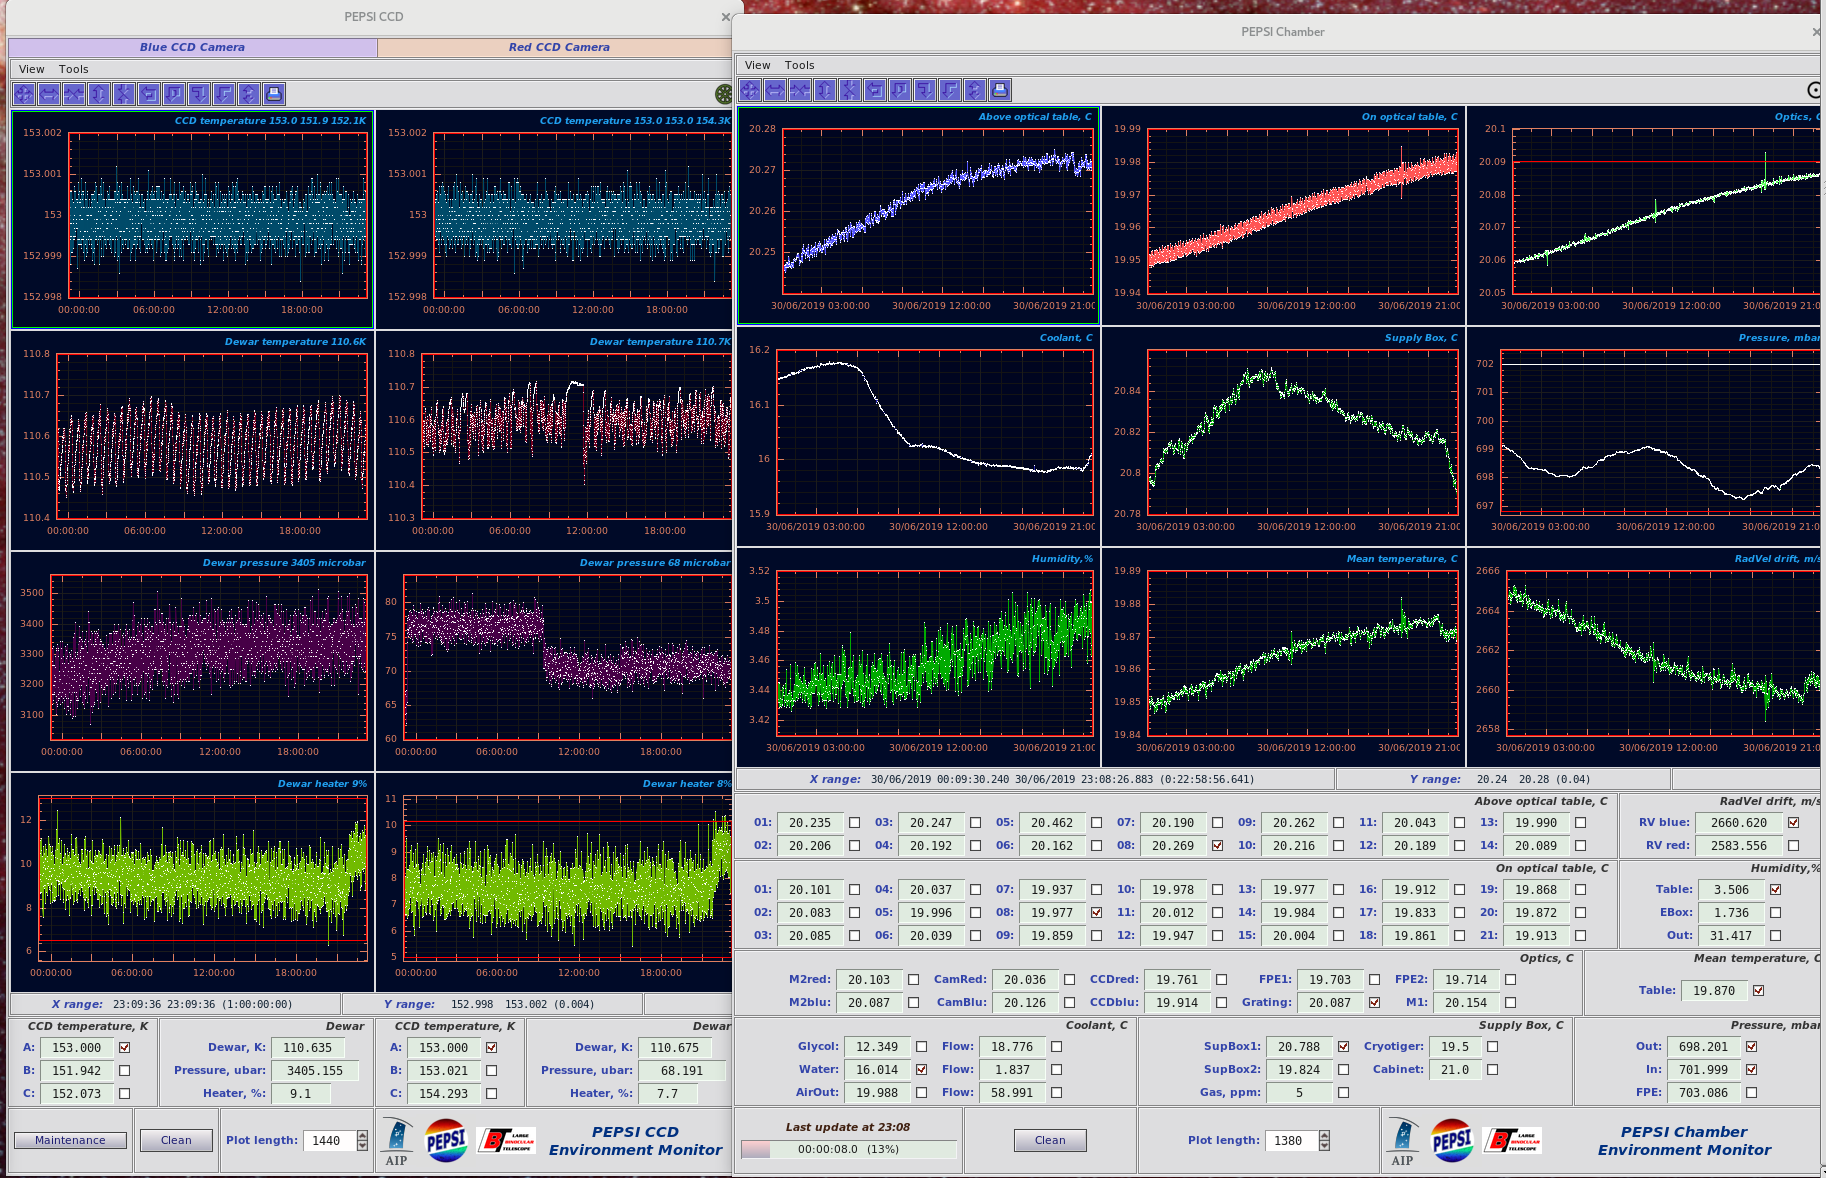
- It is essential to check the telemetry from time to time:
- If something is wrong and you are not trained to fix the problem, contact a person who is!
- The most important is the ‘Pressure‘ in PEPSI Chamber window. If ‘In’ value has red background, and one sees that pressure curves follow each others, everything is not fine.
- Other important measure is ‘Dewar heater‘ in PEPSI CCD window. If it approaches 0, the dewar pressure rises and pumping is needed.


X Troubleshooting
- If clicking anything at the interface does not work, try restarting the VPN connection
- When VATT computers have to be rebooted, the connection to them is lost and connection to VATT has to be re-established. This is done unchecking and re-checking the square VATT button in the main interface. If that does not work, then PEPSI software has to be closed and restarted.
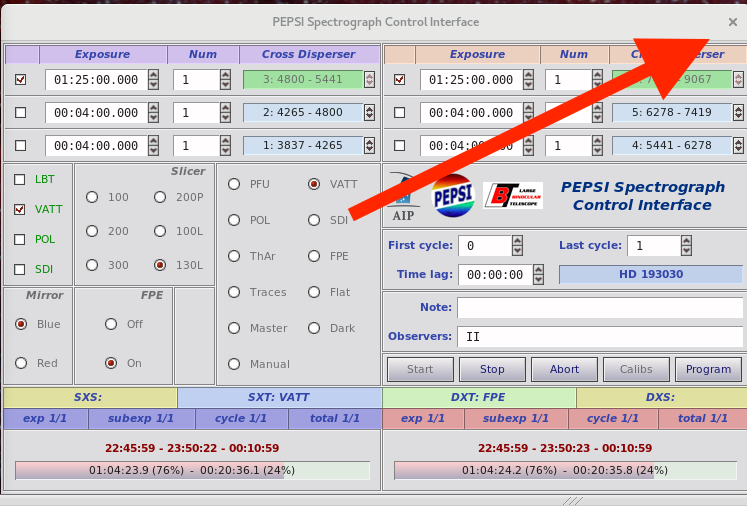
- Close it by clicking x in ‘PEPSI Spectrograph Control Interface’:
- Start opening as described in the beginning of the instructions.
- Close it by clicking x in ‘PEPSI Spectrograph Control Interface’:
- In case restarting the interface does not close VATT windows (VATT Telescope Control Interface, VATT Guiding Camera and VATT Guider), type in terminal killVATT
- You have problems with pointing if
- ‘PEPSI VATT Control Interface’ Telescope section has either Azimuth or Altitude with red background
- The cross profiles in ‘VATT Guider‘ window do not converge to zero
- Contact telescope operator in order to solve the situation!
- Sometimes the software program freezes or even crashes (STA Archon time out). If that happens, find the following terminal
and type Ctrl+c, wait some time and start everything again by typing ‘pepsi’
If terminal gives ‘Lost connection with Camera’, one can go to ‘PEPSI Control Unit’ Maintenance, but in order to do that, you should know what you are doing. Moxa-Power-Ccd Controllers, wait 10 seconds. In case of pressure problem, use again Maintenance.